Showing posts with label diy homework. Show all posts

washi taped matches

Thursday, April 17, 2014

i am sharing today a super easy DIY using matches and colorful washi tapes. it's not the most original idea and i've seen it pinned in pinterest so many times. i just thought i'd actually make them as i found myself almost out of my decorative matches. 

i am constantly burning candles around the house and i knew i was going to run out of matches pretty soon. i forgot to order those lovely matches so after a quick trip to the grocery, i worked on embellishing an inexpensive pack of matches (under $ 1.50 for a pack of 10 small-sized matches) with washi tapes. 

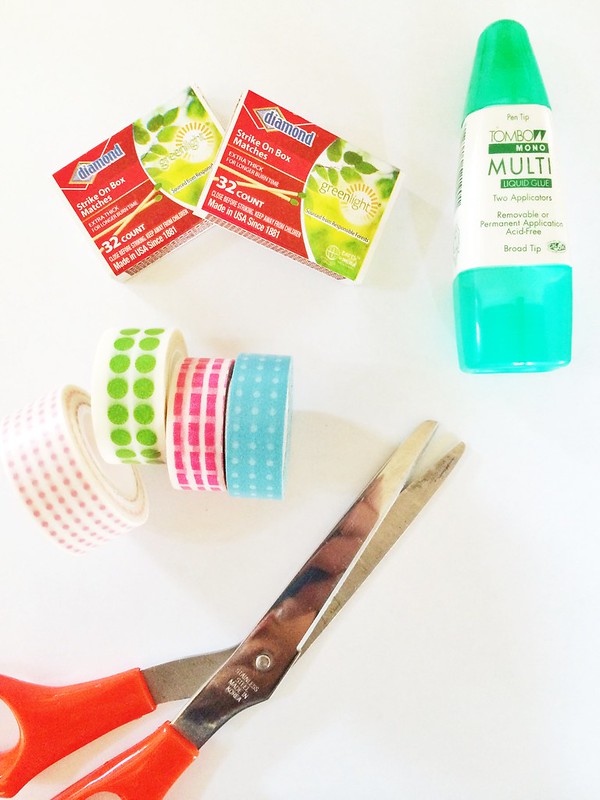
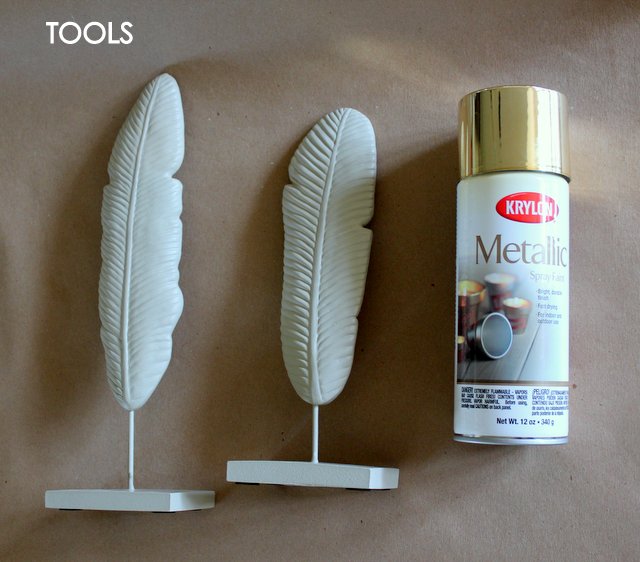
here are your supplies : 

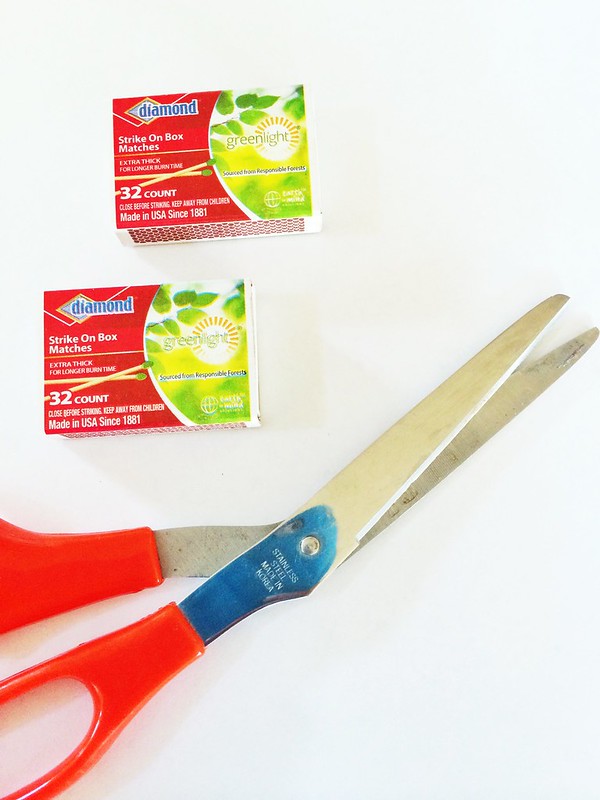
 matches, washi tapes, glue, white paper, scissors

Untitled

before taping the matches with washi tapes, cut and cover the match logo with white paper. glue a cut out paper and cover the sides with logo to cancel out any colors that may appear under the washi tape. a blank canvas shows the pattern and color of the washi tapes more. note : remember not to cover paper on the strike pads. 


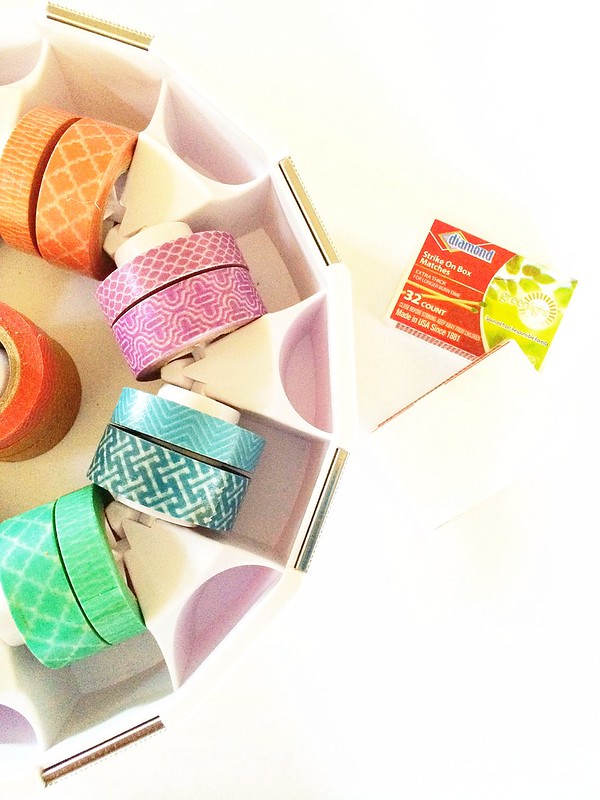
once those logos are covered, you can go to town with your washi tape designs! 


Untitled

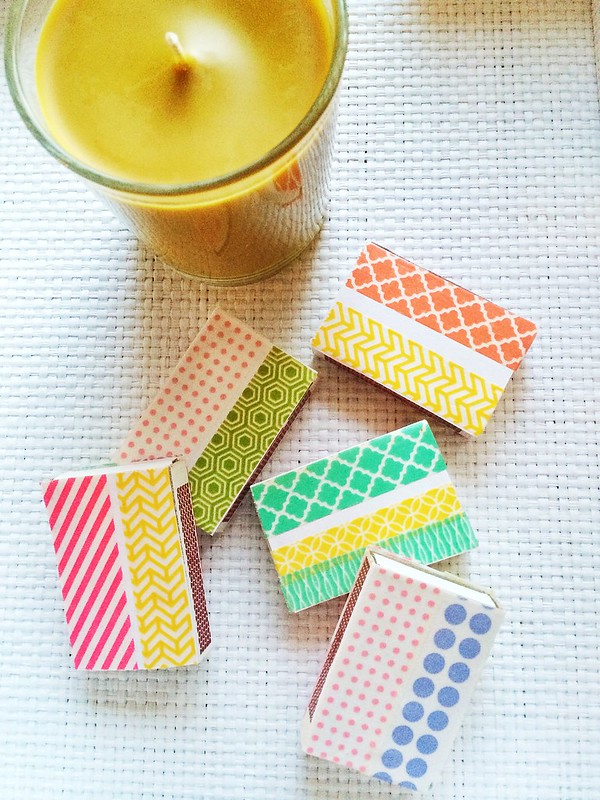
and voila, here they are! so easy! 

Untitled


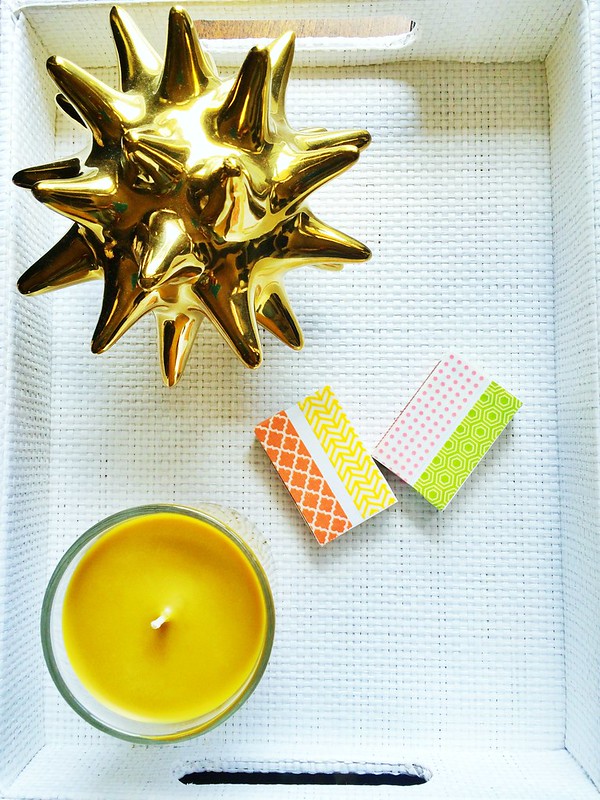
tray from jonathan adler for jcpenney // gold urchin from zhush // candle


to check out my previous easy DIY projects, visit here and here

all photos by SCF


friday faves

Friday, July 26, 2013

i've got some really good ones to share today. two amazing DIYs, my dream house and the ultimate sweet  soiree!
scroll down for the all important links.......


  • blessed with the perfect california weather, this dream house of mine is the perfect home inside and out! 
  • here's a helpful how-to tutorial on how to clean and get rid of all those stubborn soot and wax from your empty candle jars - they're the perfect vessels for flowers, pens, makeup brushes and more later on

oh before i go, have you all checked my sponsor KLURY'S latest new arrivals in the store? there's tory burch, missoni, chanel, prada  galore and more! the prices are hard to resist - do check them out!

ok, i'm excited for the weekend ~ the whole family is going to a birthday cruise celebration and just seeing relatives and friends is just enough for me to look forward for the weekend. see you all here monday! 


duct tape tray

Thursday, July 25, 2013

a few weeks ago i found a fabulous yet easy DIY frame and tray decorated with patterned duct tape from kelly (fabulous K) and megan (honey were home). i immediately scrambled around the house looking for something to tape up. 

i remembered i still have a few acrylic frames from a past DIY and on one of my frequent trips to target, i picked up an orange patterned duct tape. there were a lot of choices but i thought this design was fresh and bright and would liven up a desk or countertop with a tray taped with it. there's not really a step by step tutorial on this DIY because really all you need is a pair of scissors and start taping the area desired covered. i didn't tape the sides since i still want the clear acrylic to show. 

i think it turned out really pretty. it's the perfect way to spruce up my bathroom dresser. thanks kelly  and megan  for the inspiration! 


i got my acrylic frame from michaels (used as a tray) but you can get more sizes HERE


DIY acrylic tray

Tuesday, February 26, 2013

i've always meant to try this DIY acrylic tray since the holidays. my version uses a very inexpensive acrylic frame from michaels craft store frames section (thanks to a tip from instagram!). an 8 x 10 picture frame is only $ 3.99. it also comes in other sizes all under $ 10. it is not a deep tray, its really meant for pictures but i don't think it matters. container store also carries these acrylic stacking trays in more varied sizes and slightly deeper versions.


supplies : 

acrylic tray
wrapping paper (i used one i already have from target's $ 1 bin)
scissors or blade

this is one easy tutorial. pick your paper liner and cut the desired size (making it slightly bigger - you will go back and trim excess later). turn over your acrylic tray and make sure the bottoms are clean. apply the mod podge clear (follow instructions on container) to the bottoms of the tray (reverse side). 

once that's coated, slowly apply your paper, smooth it out to avoid bubbles. let it dry. then you can cut the excess paper using scissors or a blade cutter for a more finished look. enjoy!

check out more DIY tray versions from the talented courtney (her's has monograms on it!) and from For Chic Sake's metallic DIY with free printables!

oh and by the way, that pretty bead necklace is now available in my goodsie shop!  


turning a new leaf

Tuesday, July 3, 2012


a few days ago on one of my weekly routine target trips, i found two plain leaf figurines made of polyresin in ivory color. there's nothing really wrong in how they look but i felt a quick project coming along to add a little pizzazz to them!

i recall reading this from krista's blog and had ever since been wanting a leaf tray but never got the chance to stop by homegoods in the hopes of scoring one. so when i saw these, i was excited to spray paint them gold and perch them somewhere in the house. it is quite an easy project that i'm embarrassed to even blog a step by step post here but i am so happy with the results i can't wait to share!


i thoroughly cleaned the figurines first and then went crazy with the metallic gold spray paint i picked up from michaels craft store


and voila! i love the after results - i like the matted look of the leaves and the slight imperfection of my paint spraying abilities. it's now on our coffeetable but i'm still looking for that perfect spot it will be in the house!


just keeping it real. a 5 year old gathering his toys to put back on the coffeetable (enough styling and snapping pics away, mommy!) 


i'm totally happy with it and for under $ 20, you get to create a little home accent decor truly your own! 

::::::::::::::::::::::::::::::::::::::::::::::::::::::::::::::::::::::::::::::::::::::::


QUICK REMINDER of our ongoing MAY BOOKS giveaway, 


visit this previous post for the full details on how to enter! 


memories keepsake in a bottle

Thursday, June 21, 2012

last friday, aston came home from vacation bible school with the most precious keepsake they made just in time for father's day.

their summer camp and VBS theme this year was "under the sea" and this was the perfect project for them. inside a mason jar is filled with sand and seashells topped with his photo and wrapped with a raffia string. just darling!


For Father's day

this keepsake gift can be easily recreated especially with the kids being home from school and with many beach trips for the summer, this is the perfect souvenir they can make. i found this tutorial (link below) from tip junkie and i hope it can guide you in creating your memories keepsake in a jar!


{photo source and DIY instructions, HERE}


easter break

Wednesday, April 4, 2012


i will be taking a break for the easter weekend and i'm signing off from this blog a little early today. i have family and relatives arriving from out of town and i'm looking forward to catch up with them. i am leaving you with these gorgeous egg tree centerpiece in all the spring color palette that's really soft and lovely from decor8. i'll see you back here on monday! 
have a wonderful easter everyone! 


easy easter DIY ideas

Wednesday, March 21, 2012

i need to get my crafting groove back on especially that easter is a few weeks away. last year, i tried my hand in creating these easy projects just in time for easter. today i did some home spring redecorating, so hopefully that translates to more spring cleaning and sprucing for our home and easter crafts for our little boy. i turn to pinterest for inspiration but sad to say, i do a lot of pinning but less doing. i want to change that and really take matters into my own hands and start crafting!

cinnabunny rolls
i'd love to bake this on easter weekend. undeniably yummy and the kids will enjoy finding a bunny on their plates. tutorial can be found here


spring centerpiece
i'd like to create a green organic arrangement inspired by this lovely piece. instead of fresh vegetables, place eggs for a perfect easter spring centerpiece


DIY speckled eggs
love the look of easter speckled eggs? here's an easy DIY how-to steps


chocolate bird nest on spoon
i think this is an adorable treat for the kiddos on easter brunch. or ideal as a party favor for an easter egg hunt party. a step by step tutorial can be found here


chocolate covered peeps
and lastly, i am excited to do this. definitely easy and fun to do with the kids. dip peeps to melted chocolate and then dip them in colorful edible sprinkles. easy peasy! full tutorial here


i can't wait to get crafting, baking and making! 


DIY grilled cheese bar

Wednesday, March 7, 2012

throwing a last minute get-together with friends? katherine from the blog, the side stuff, shows us her fun idea of a deluxe grilled cheese bar party she recently hosted. what a great idea getting your guests to build their own grilled cheese sandwiches and scooping their own roasted red pepper soup to match it. less preparation and best of all, minimal clean up! 

the cool instruction signage to guide the guests

with simple eye-catching decor ~ you've got yourself an amazing party with a cool DIY "cooking" concept all the guests get to enjoy!


YUM! 

for the complete post and detail of this awesome party, visit HERE. thank you katherine for sharing!

all photos from the side stuff 

::::::::::::::::::::::::::::::::::::::::::::::::::::::::::::::::::::::::::::::::::::


btw, don't forget to join our ongoing

GIVEAWAY


on how to join, details HERE!

halloween costumes

Friday, September 16, 2011

while we are in halloween mode here in the blog, might as well share some of the cutest and unique costume ideas for your little ones (and some furry friends too). there are tons of tutorials for DIY costumes out there if you are a crafty and creative mom but unlike me, i settle for an inexpensive store-bought costume. i have not used a sewing machine ever (i know, shame on me) but that does not stop me from admiring one-of-a-kind unique DIY costumes that are just too adorable!


Source: hgtv.com via LiliPaz on Pinterest


hahahahah! these precious babies just made my day!
 have a great weekend friends!


paper flower blooms

Wednesday, July 6, 2011


full tutorial HERE and HERE 
{via aunt peaches}

photo sources L-R clockwise :

lauren makes
aunt peaches
aunt peaches
oh baby boy 


july fourth bunting banner

Sunday, June 12, 2011

how adorable is this bunting banner by telisa of sugar tot designs? it's got all the design elements i love - burlap and mod pattern together in one beautiful bunting banner perfect for fourth of july! 

telisa shares a step by step tutorial over at her blog. so, head on over there now! 


all photos by telisa of sugar tot designs


DIY party blower birthday wreath

Thursday, May 26, 2011

i found this pretty cool DIY project for a party blower birthday wreath via The Silly Pearl.

the full tutorial can be found here. its too cute!


photos by The Silly Pearl

visit The Silly Pearl for amazing DIY projects for the home, entertainment, kids and so much more!

easy easter treats

Wednesday, April 20, 2011


cake pops bouquet

as inspired by my insanely creative and talented blogger friend christine of pure joy events, i tackled this easy cake pops bouquet project for the easter weekend festivities. simple and easy as 1, 2, 3! 

all you need are cakepops (i used cakepops from starbucks $2.50/2)
 tulip cupcake liners (mine was from lulu's cupcake etsy boutique)
 styrofoam and a vase (i used my ikea pots) 

just make a slit using a pair of scissors at the bottom of the cupcake liner enough to fit the cakepop stick. finally, arrange them accordingly by piercing each cakepop in the styrofoam inside the vase.     

that's it ~ now you have your own cakepop blooms! 


happy easter ! 


linky parties : 


easter basket [my simple DIY]

Monday, March 28, 2011

inspired by blogger friend meredith of the sweet T family, i managed to still find the same bucket from hobby lobby and grabbed a set of stickers for our little guy's name and monogram. fast, easy and for under $5 (thanks to their 50% discounts) ~ i love it! 


linking to : 


Tip Junkie handmade projects


this blessed nest